In this example, our focus will be on creating a calendar component with HTML5 and CSS3 and later add some interactivity using javascript.
Calendars will be needed in websites whether just for information or when date input is needed. The user is always willing to see nice stuff.
We can create calendars with HTML5 and style them with CSS3, but that is just static. Most likely, you will want to make it interactive.
That is enabled by javascript (or its libraries) that can help you animate things and change views fast and easy. But lets start with html and css.

1. Prerequisites
The following setup is required for you to achieve the results being explained.
1.1 Basic Setup
Go ahead and create a new html file inside your project folder with its basic syntax:
<!DOCTYPE html>
<html>
<head>
	<title>Calendar Component</title>
</head>
<body>

<!-- STYLE SECTION -->

<style type="text/css">

</style>

<!-- HTML SECTION -->

</body>
</html>
1.2 Get Bootstrap
Bootstrap is a innovative and easy to use CSS framework that we will use mainly for its grid based structure.
In order to use it, just link the css and js files in the head section from their official links like below:
<!DOCTYPE html>
<html>
<head>
<title>Calendar Component</title>
<!-- Latest compiled and minified CSS -->
<link rel="stylesheet" href="https://www.webcodegeeks.com/wp-content/litespeed/localres/aHR0cHM6Ly9tYXhjZG4uYm9vdHN0cmFwY2RuLmNvbS8=bootstrap/3.3.4/css/bootstrap.min.css">
<!-- Latest compiled and minified JavaScript -->
<script src="https://www.webcodegeeks.com/wp-content/litespeed/localres/aHR0cHM6Ly9tYXhjZG4uYm9vdHN0cmFwY2RuLmNvbS8=bootstrap/3.3.4/js/bootstrap.min.js"></script>
</head>
2. Creating the Calendar
Below, you can see the step by step calendar creation. We will create the calendar first in html and then add the css.
2.1 HTML
The html section is going to include the following basic structure:
1. A wrapper – this tag will wrap all the elements inside the calendar
2. A header – it will contain the month title and left and right navigation icons
3. A calendar-body – it will contain the weekdays row and the date rows.
4. A current-date – it will be a section in the bottom of the calendar showing the actual date.
We will need 1 row for the weekdays and 5 rows for date rows. The structure will look like this:
Nothing shows in the browser yet. Now that we’ve created the rows, lets add the following components:
1. Navigation Icons – there is a class on bootstrap for these icons: glyphicon glyphicon-chevron-left/right
2. Add the month that the calendar is showing in the header section wrapped inside a p tag
3. Devide the rows into 7 columns with bootstrap’s class: col-xs-1 and add weekdays inside p tags
4. Use the same col-xs-1 to dates but wrap the paragraph inside anchor tags, they need to be clicked
With the code above added, our html now looks like this:
<div class="wrapper">
<div class="header">
<span class="glyphicon glyphicon-chevron-left"></span>
<span class="glyphicon glyphicon-chevron-right"></span>
<p>January 2015</p>
</div><!-- end header -->
	<div class="calendar-body">
		<div class="row weekdays">
			<div class="col-xs-1"><p>Su</p></div><!-- end col-xs-1 -->
			<div class="col-xs-1"><p>Mo</p></div><!-- end col-xs-1 -->
			<div class="col-xs-1"><p>Tu</p></div><!-- end col-xs-1 -->
		    <div class="col-xs-1"><p>We</p></div><!-- end col-xs-1 -->
			<div class="col-xs-1"><p>Th</p></div><!-- end col-xs-1 -->
			<div class="col-xs-1"><p>Fr</p></div><!-- end col-xs-1 -->
			<div class="col-xs-1"><p>Sa</p></div><!-- end col-xs-1 -->
		</div><!-- end row -->

		<div class="row dates">
			<div class="col-xs-1"><a href="#"><p class="inactive">28</p></a></div>
			<div class="col-xs-1"><a href="#"><p class="inactive">29</p></a></div>
			<div class="col-xs-1"><a href="#"><p class="inactive">30</p></a></div>
			<div class="col-xs-1"><a href="#"><p class="inactive">31</p></a></div>
			<div class="col-xs-1"><a href="#"><p>1</p></a></div>
			<div class="col-xs-1"><a href="#"><p>2</p></a></div>
			<div class="col-xs-1"><a href="#"><p>3</p></a></div>
			</div><!-- end row -->

		<div class="row dates">
			<div class="col-xs-1"><a href="#"><p>4</p></a></div>
			<div class="col-xs-1"><a href="#"><p>5</p></a></div>
			<div class="col-xs-1"><a href="#"><p>6</p></a></div>
			<div class="col-xs-1"><a href="#"><p>7</p></a></div>
			<div class="col-xs-1"><a href="#"><p>8</p></a></div>
			<div class="col-xs-1"><a href="#"><p>9</p></a></div>
			<div class="col-xs-1"><a href="#"><p>10</p></a></div>
		</div><!-- end row -->

		<div class="row dates">
			<div class="col-xs-1"><a href="#"><p>11</p></a></div>
			<div class="col-xs-1"><a href="#"><p>12</p></a></div>
			<div class="col-xs-1"><a href="#"><p>13</p></a></div>
			<div class="col-xs-1"><a href="#"><p>14</p></a></div>
			<div class="col-xs-1"><a href="#"><p>15</p></a></div>
			<div class="col-xs-1"><a href="#"><p>16</p></a></div>
			<div class="col-xs-1"><a href="#"><p>17</p></a></div>
		</div><!-- end row -->

		<div class="row dates">
			<div class="col-xs-1"><a href="#"><p>18</p></a></div>
			<div class="col-xs-1"><a href="#"><p>19</p></a></div>
			<div class="col-xs-1"><a href="#"><p>20</p></a></div>
			<div class="col-xs-1"><a href="#"><p>21</p></a></div>
			<div class="col-xs-1"><a href="#"><p>22</p></a></div>
			<div class="col-xs-1"><a href="#"><p>23</p></a></div>
			<div class="col-xs-1"><a href="#"><p>24</p></a></div>
		</div><!-- end row -->

		<div class="row dates">
			<div class="col-xs-1"><a href="#"><p>25</p></a></div>
			<div class="col-xs-1"><a href="#"><p>26</p></a></div>
			<div class="col-xs-1"><a href="#"><p>27</p></a></div>
			<div class="col-xs-1"><a href="#"><p>28</p></a></div>
			<div class="col-xs-1"><a href="#"><p>29</p></a></div>
			<div class="col-xs-1"><a href="#"><p>30</p></a></div>
			<div class="col-xs-1"><a href="#"><p>31</p></a></div>
		</div><!-- end row -->

		<div class="line"></div>

		<div class="current-date">Monday, January 26</div>
	</div><!-- end calendar-body -->
</div><!-- end wrapper -->
Well, now we’ve got a view in the browser: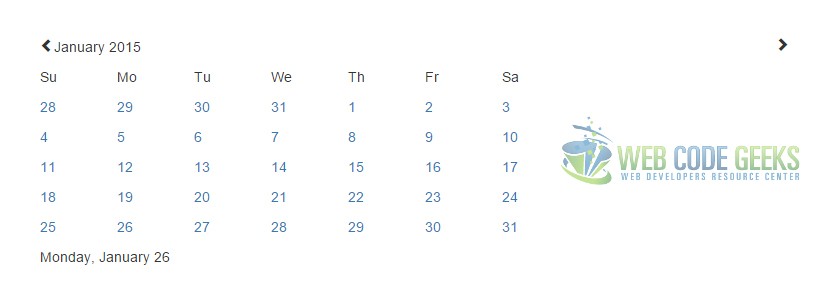
Don’t worry about the right nav icon going far, we’ll fix that with css. Also notice that I have added an inactive class to some dates.
That is beacuse those dates are not from the current month and need to be styled a bit different (i.e a lighter color than the rest).
2.2 CSS
Here comes the fun part, styling is what gives elements a shape and a overall look. Lets start with these universal attributes:
  body {
  	font-family: "Montserrat";  /* just a cutsom font */
  }

  a:-webkit-any-link{
	text-decoration:none !important;	/* do not underline links */
	color: black; !important;	        /* give links a default color */
  }
For the navicons to show right add pull-left and pull-right next the the other classes:
<span class="glyphicon glyphicon-chevron-left pull-left"></span>
<span class="glyphicon glyphicon-chevron-right pull-right"></span>
Now give the basic stucture elements some styling attributes:
  .wrapper {
  	margin: 10em;					/* just a temp margin */
  	border: 0.1em solid #ccc;	/* wrap the calendar inside a box */
  	width: 20em;				/* define a width for the box */
  	height: 24em;				/* define a height for the box */
  	box-shadow: 0.1em 0.2em 0.8em #ccc;	/* box shadow for better view */

  }

  .header {
  	height: 4em;					/* define a height for the header */
  	background-color: #3f51b5;		/* give the header a background color */
  	color: white;					/* give the header a text color */
  	text-align: center;				/* center the text inside the header */
  }

.calendar-body .col-xs-1 {
  	width: 2.5em;					/* give each column a fixed width */
  	margin-left: 0.2em;				/* have some space between columnd */
  	text-align: center;				/* align text in the center */
  }
The view of our calendar became:
Ok, next add attributes to individual elemtents to enhance thier look inside the calendar:
.header p {
	padding-top: 1.2em;				/* vertical centering */
	text-transform: uppercase;		/* all caps text  */
  }

.header span {
  	padding: 1.3em;			/* vertical and horizontal centering icons */
}

.inactive {					/* inactive dates get a light gray text color */
	color: #ccc;
}

.weekdays {
	padding: 1em;			/* giving weekdays some space around */
}

.dates {
	padding: 0.2em 1em 0.2em 1em;	/* giving dates some space  */
}

.line {								/* a gray line separator  */
	height: 0.1em;
	border: 0.1em solid #EEEEEE;
}

.current-date {					/* styling the current date section  */
	text-transform: uppercase;
	text-align: center;
	padding: 0.7em;
}

.calendar-body .row .col-xs-1 p:hover {
	color: #4778a6;			/* hover state on all dates  */
}
And we finally have a pretty styled and moder looking calendar. Look at this:
Simple as that, looks like we’re done. Before concluding this example lets see a pre-made calendar from http://demos.telerik.com/ where the calendar has full interactivity enabled by jQuery library.
3. Interactivity? Yes, with jQuery!
In this section, I intend to let you know calendars can and should be fully interactive with date/month/year choosing.
The example below is just for demonstration, it is a template on the internet that has interactive behaviour.
<!DOCTYPE html>
<html>
<head>
    <base href="http://demos.telerik.com/kendo-ui/calendar/index">
    <style>html { font-size: 12px; font-family: Arial, Helvetica, sans-serif; }</style>
    <title>Kendo UI Example for WCG</title>
    <link rel="stylesheet" href="http://cdn.kendostatic.com/2015.1.429/styles/kendo.common-material.min.css" />
    <link rel="stylesheet" href="http://cdn.kendostatic.com/2015.1.429/styles/kendo.material.min.css" />
    <link rel="stylesheet" href="http://cdn.kendostatic.com/2015.1.429/styles/kendo.dataviz.min.css" />
    <link rel="stylesheet" href="http://cdn.kendostatic.com/2015.1.429/styles/kendo.dataviz.material.min.css" />

    <script src="http://cdn.kendostatic.com/2015.1.429/js/jquery.min.js"></script>
    <script src="http://cdn.kendostatic.com/2015.1.429/js/kendo.all.min.js"></script>
</head>
<body>
      <div id="example">
	<div class="demo-section k-header" style="width: 300px; text-align: center;">
                  <div id="calendar"></div>
             </div>
            <script>
                $(document).ready(function() {
                    // create Calendar from div HTML element
                    $("#calendar").kendoCalendar();
                });
            </script>
        </div>
</body>
</html>
Everything is in there, including html, css and js, but css and js are linked from the internet.
For more examples of interactive calendar refer here.
The example for which the code is above would look like this:
4. Conclusion
Even though calendars can be easily created and styled in html and css, when it comes to interactivity, you’ll need a more professional level of coding in javascript if you are willing to do it fully customized from scratch.
However feel free to get ready jQuery code to animate things a little bit, while you can have your own html and css.
Note that you might also need to put attributes like value or name to your elements when considering a backend supportive calendar, where information is submitted and needs to be sent somewhere.
5. Download
You can download the full source code of this example here: HTML5 and CSS3 Calendar