How to enable/disable an element using jQuery and JavaScript? Example
Sometimes we need to enable and disable input elements e.g. text box, radio buttons or checkbox, how can we do it dynamically without loading the page? Well, we can use JavaScript, particularly jQuery to do this. An element can be disabled in HTML by setting disable property to true and enabled again by setting disabled=false. By using jQuery, we can grab the element we want to enable or disable and change this property by using prop() or attr() function, depending upon which version of jQuery you are using. prop() function was added in jQuery 1.6 and its the standard way to deal with properties but attr() function does the same job for jQuery 1.5 and lower version so you can use attr() for the same purpose in jQuery version lower than 1.6.
Btw, you can also enable or disable any HTML element e.g. input text field using plain old JavaScript. All you need to do is get the element by id and set its disabled property to true or false. You can do that when a user clicks on some button by calling a JavaScript function by using the
onclick attribute as shown in our first example.
How to enable/disable text field using JavaScript
In this example, we have an HTML form, text boxes, and a couple buttons to enable and disable that text field. I am using plain JavaScript, no jQuery yet to accomplish the task. The steps are as follows:
1) Register enable() and disable() function with buttons to enable and disable text field
2) Use getElementById() to grab the text field
3) Set the disabled field to true or false
Here is the sample HTML file with JavaScript solution:
<html>
<head>
<title>How to enable or disable input using JavaScript</title>
</head>

<body>

<h2>Enabling and Disabling text field using JavaScript</h2>

<form id="registration-form">
Enter your name: <input type="text" id="name">
</form>

<button onclick="disable()">Disable the text field</button>
<button onclick="enable()">Enable the text field</button>

<script>
function disable() {
document.getElementById("name").disabled = true;
}
function enable() {
document.getElementById("name").disabled = false;
}
</script>

</body>
</html>
When you click the button “Disable the text field”, the disable() function will be called and disabled property of text field will be set to true, which means you cannot enter text on this text field anymore, it’s disabled. You can re-enable the text field by clicking on “Enable the text field” button, it will call the enable() function which will reset the disabled property to false.
How to enable/disable text field using jQuery?
Here is the jQuery code to do the same thing. In this example, we have used prop() function, if you are running on jQuery 1.5 or lower version, just replace the prop() with attr() and it should work fine. Similar to the previous example, we have two buttons btn_enable and btn_disable to enable and disable the text field.
We attach the event handler using click() function at $(document).ready() which called after page is loaded. On event handler we grab the text field by using jQuery ID selector e.g. $(“#name”) and then called prop(“disabled”, false”) to disable this text field.
When a user calls the enable button we just set the disabled property to true by calling prop(“disabled”, true). This enabled the text field again. Remember, you cannot enter text into a disabled text field.
<html>
<head>
<title>How to enable or disable textfield using jQuery</title>
</head>

<body>

<h2>Enabling and Disabling text field using jQuery</h2>

<form id="registration-form">
Enter your name: <input type="text" id="name">
</form>

<button id="btn_disable" >Disable the input</button>
<button id="btn_enable" >Enable the input</button>


<script src="http://code.jquery.com/jquery-1.6.2.min.js"></script>
<script>
$(document).ready(function() {

$("#btn_enable").click(function(){
$("#name").prop("disabled", false);
});

$("#btn_disable").click(function(){
$("#name").prop("disabled", true);
});

});
</script>

</body>
</html>
You can test this by running in your browser. Just remember, not to call removeProp() function to enable the button again e.g. removeProp(“disabled”) because it will remove the “disabled” attribute from the text field and it won’t be possible to disable it again in future, instead just use prop(“disabled”, false) method. Btw, if you are new to jQuery I suggest you to first go through
jQuery: Getting Started By Craig Shoemaker to learn basic stuff.
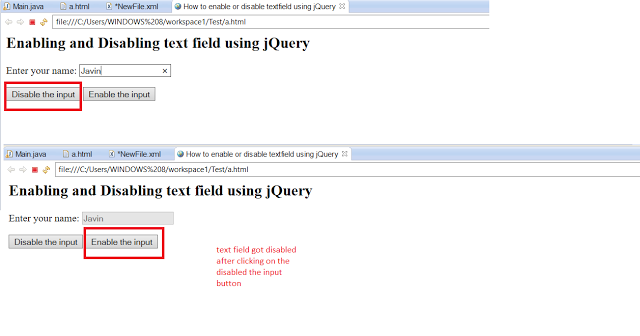
Here is the screenshot of how it will look like when you open the page in a browser like Edge or Chrome.
That’s all about how to enable and disable an element using JavaScript and jQuery. In this example, we have disabled the text field and re-enabled again but you can use this technique to enable/disable any HTML element. You can use JavaScript or jQuery based upon what is used in your project. My suggestion is to be consistent. If you are already using JavaScript then use that, but if you are using jQuery then it’s better to do it as jQuery way.
Further Reading
jQuery Fundamentals By Dan Wahlin
Advanced Techniques in JavaScript and jQuery By Kevin Murray
Head First jQuery and JavaScript
Other jQuery and JavaScript tutorials you may like to explore
- Top 5 jQuery Books Every Web Developer Should Read? (see here)
- How to get current URL Parameter using jQuery? (solution)
- How to use multiple jQuery Date picker element in one HTML page? (answer)
- 10 Examples of jQuery selectors for Web Developers (tutorial)
- How to redirect web page using jQuery code? (answer)
- 3 Ways to parse HTML using JSoup in Java? (solution)
- How to reload/refresh a page using jQuery? (answer)
- How to prevent double submission of POST data using JavaScript? (solution)
- How to modify multiple elements in one go in jQuery? (example)
- How to check and uncheck checkboxes using jQuery? (tutorial)
Thanks for reading this article so far. If you like this article then please share with your friends and colleagues. If you have any question or doubt then please drop a comment.
| Reference: | How to enable/disable an element using jQuery and JavaScript? Example from our WCG partner Javin Paul at the Javarevisited blog. |


