HTML5 360 Viewer Example
In this article we will look at something interesting that has a lot of fun. We look at how to build a 360 degree product viewer and a 360 degree panoramic image viewer. You must have noticed the 360 degrees viewer on popular e-Commerce sites where you can rotate and view the product from all around. Also, new smartphones these days have a feature to take panoramic shots of locations looking at which gives a feel of being there yourself in person. We will create a web page to look at such snaps and interact with them.
1. Tools & Technologies
To build the example application, I have used the following toolset. Some of them are required whilst others could be replaced by tools of your own choice.
Node.js in essence is JavaScript on the server-side. We use it along with the Express module to create a barebones web server to serve files and resources to the browser. I am comfortable with using Visual Studio Code IDE but you can choose any text editor of your choice.
2. Project Layout
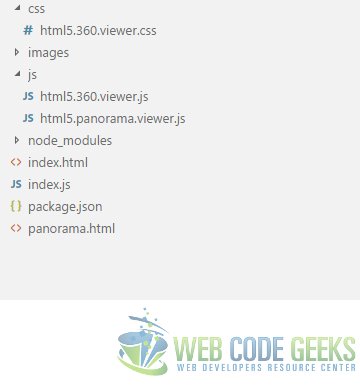
Our project’s layout looks like below:

3. 360 degree Product Viewer
To go about this we need images of an object of interest taken from all around. So, I went about taking such snaps with my phone camera. I renamed each of the 24 images like Car360_1.png, Car360_2.png...Car360_24.png . The reason for the naming convention will become clearer shortly. I placed the images in folder named, well, images in the project.
3.1. HTML Markup
We start off with a standard template of a standard HTML5 page. Next, we add a couple of img and an input slider. This leaves us a Markup looking like:
index.html
<!DOCTYPE html>
<html lang="en">
    <head>
        <meta charset="utf-8">
        <meta http-equiv="X-UA-Compatible" content="IE=edge">
        <meta name="viewport" content="width=device-width, initial-scale=1">
<!-- The above 3 meta tags *must* come first in the head; any other head content must come *after* these tags -->
        <title>WCG -- HTML5 360 Viewer Example </title>

        <link rel="Stylesheet" href="css/html5.360.viewer.css"/>
<!-- HTML5 shim and Respond.js for IE8 support of HTML5 elements and media queries -->
<!-- WARNING: Respond.js doesn't work if you view the page via file:// -->
<!--[if lt IE 9]>
<script src="https://oss.maxcdn.com/html5shiv/3.7.3/html5shiv.min.js"></script>
<script src="https://oss.maxcdn.com/respond/1.4.2/respond.min.js"></script>
<![endif]-->
    </head>
    <body>
        <h1>WCG -- HTML5 360 Viewer Example </h1>

        <img id="image360" src="/images/Car360_1.png" />
        <img draggable="true" id="advanced360" src="/images/Car360_1.png" />
        <input id="slider" type="range" min="1" max="24" step="1" value="1" />

        <script src="js/html5.360.viewer.js"></script>

     </body>
</html>
Things to note in the HTML are that we have setup the input slider with a min of 1 and max of 24. This is the range of values that the user can slide in. We can then take the current value of the slider and arrive at the name of the image that needs to be rendered. The image tags do not have anything special about them. The first one would be used to display an image that the user can rotate using the slider and the other one will display the same image rotating 360 degrees on its own.
3.2. JavaScript
Now onto making it work we need to write some JavaScript. Firstly we preload the images needed for this to work. After that we handle the input event of the slider. We take use the value of the slider to switch to the appropriate image in the cached list preloaded. Then we go about invoking the rotate function every 250 milliseconds to make the auto rotate feature work for the second image tag. Now, our JavaScript should look as follows:
html5.360.viewer.js
var image360 = document.getElementById("image360");
var slider = document.getElementById("slider");
var advanced360 = document.getElementById("advanced360");
var imageNo = 1;
var images = [];

//Preloading images
for(var i = 1; i < 25; i++){
    images[i] = new Image();
    images[i].src = "/images/Car360_" + i + ".png";
}

//Event handler for input from the slider as the user slides it
slider.addEventListener("input", function(){

    image360.src = images[slider.value].src;

});

//Function to switch out to the next image
function rotate(){
    if(imageNo === 0) imageNo = 24;
    else if(imageNo === 25) imageNo = 0;
    advanced360.src = images[imageNo].src;
}

//executing rotate for the advanced 360 viewer autorotate feature
window.setInterval(function(){imageNo += 1; rotate();}, 250);
3.3. Results
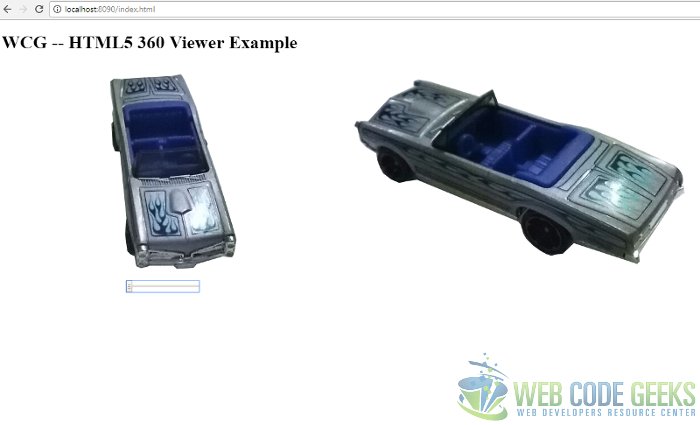
On running the application and viewing the page in a browser should look like below:

4. Panoramic Snapshot Viewer
Now let us build a page where we can pan around panoramic images or 360 degree images. We need to do the following in order.
4.1. HTML Markup
As for the HTML markup for this feature we start out with a new HTML5 page and name it panorama.html.
To this page we add an image tag with the src property set to a blank and transparent gif file. This leaves us with a page with following markup:
panorama.html
<!DOCTYPE html>
    <html lang="en">
    <head>
        <meta charset="utf-8">
        <meta http-equiv="X-UA-Compatible" content="IE=edge">
        <meta name="viewport" content="width=device-width, initial-scale=1">
<!-- The above 3 meta tags *must* come first in the head; any other head content must come *after* these tags -->
        <title>WCG -- HTML5 360 Viewer Example</title>

        <link rel="Stylesheet" href="css/html5.360.viewer.css"/>
<!-- HTML5 shim and Respond.js for IE8 support of HTML5 elements and media queries -->
<!-- WARNING: Respond.js doesn't work if you view the page via file:// -->
<!--[if lt IE 9]>
<script src="https://oss.maxcdn.com/html5shiv/3.7.3/html5shiv.min.js"></script>
<script src="https://oss.maxcdn.com/respond/1.4.2/respond.min.js"></script>
<![endif]-->
     </head>
     <body>
         <h1>WCG -- HTML5 360 Viewer Example</h1>

         <img id="panorama" src="/images/blank.gif" />

         <script src="js/html5.panorama.viewer.js"></script>

     </body>
</html>
4.2. CSS
We need to add a bit of CSS as well to basically link up the two ends of the panoramic image. We put the following bit of CSS to our css file, html5.360.viewer.css.
html5.360.viewer.css
...
#panorama{
    width: 100%;
    border: 2px solid black;
    height: 768px;
    background: url("/images/pexels-photo-356886.jpeg") 0 0 repeat-x;
}
...
The background rule ensures that while scrolling horizontally we can view the entire 360 degree view captured by the image.
4.3. JavaScript
Now onto a bit of JavaScript required to make it tick. We update the backgroundPositionX property as the user moves the cursor horizontally over the image after clicking the image once to enable auto horizontal scroll. And, of course, once the user clicks on the image once again we stop scrolling on mousemove event. Our JavaScript code looks like below:
html5.panorama.viewer.js
var panorama = document.getElementById("panorama");
var dragOn = false;
var xPos = 0;

panorama.addEventListener("mousedown", function(){
    dragOn = !dragOn;
    xPos = event.pageX;
});

panorama.addEventListener("mousemove", function(){
    var moveX = xPos - event.pageX;
    moveX = moveX * 5;
    if(dragOn){
        panorama.style.backgroundPositionX = moveX + "px";
    }
});
4.4. Results
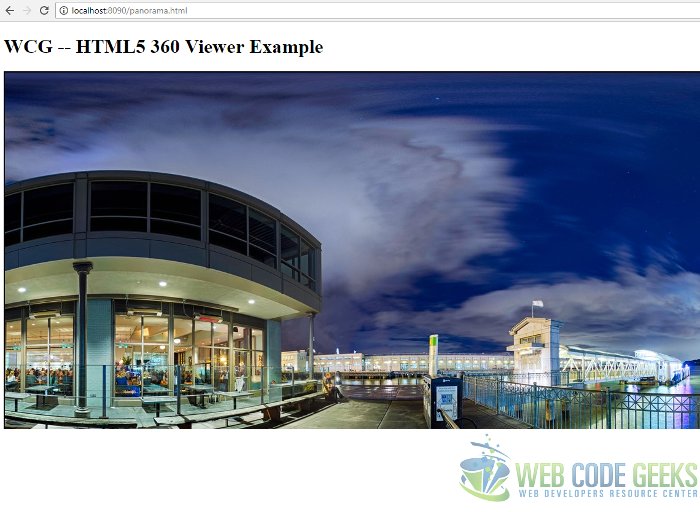
Now, when we run the application and navigate to the URL http://localhost:8090/panorama.html we should see the below:

5. Running the Project
To run the application and see it in action, you need to run the following commands at the root of the project directory:
> npm install
then
> node index.js
6. Download the Source Code
This wraps up our look at HTML5 360 Viewer Example.
You can download the full source code of this example here : WCG — HTML5 360 Viewer Example


hey really great work.
But when I dowload the code and start it, only a white page with WCG — HTML5 360 Viewer Example and a window with a black frame is open. I taste it with some different browsers but it doesn´t work. Maybe some help ?
best greets
Hi,
Thanks!
I have started troubleshooting and will share details shortly.
Thanks & Regards,
Siddharth Seth
Hi,
I found out the source of the problem. It was caused due to a off by one error while accessing images array in the file html5.360.viewer.js. To fix the same just replace the rotate() function with the code below:
//Function to switch out to the next image
function rotate(){
if(imageNo === 25) imageNo = 1;
advanced360.src = images[imageNo].src;
}
I have tested this and it should work out for you too.
Thanks & Regards,
Siddharth Seth