Angular.js Architecture Tutorial
Angular is one of the most used frameworks in web developing and more, and this is for a good reason. If you already know its benefits then I’m sure that the next step for you would be to get ready to use it in your projects as soon as possible.
One of the most important step in learning how to develop using AngularJS is by learning its architecture model, which is largely MVC. But what does MVC stand for and how can I implement it in my app? Let’s find out!
1. Intro to MVC
In Angular we organize things differently than regular JavaScript. One of the popular ways of organizing applications is MVC Architecture. MVC is an acronym for Model View Controller and is a very popular design pattern in the web world. It helps you to organize your application in three different layers and isolates the business logic from its presentation. Let’s see what each of these components stands for and what is their role in the MVC architecture.
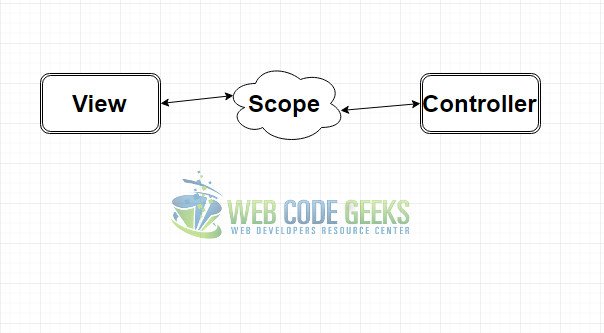
The picture above represents the gist of the MVC architecture perfectly: Basically you have a view, which is how the data is represented to the user, and a controller which is used to modify this data. The scope, or the model, is what you use to bind these two together, so the changes to one can reflect to the other.
Now, much of the time when you’re building application you will need:
- Model to represent current state of your application
- View to display the data
- Controller that controls the relation between Models and Views.
Let’s analyze each of them more closely.
2. The Model and its creation
What exactly are models in AngularJS? A model in Angular can be a primitive type such as string, number, boolean or a complex type such as objects. There’s no special class, no special getter or setter method, in short a model is just a plain Javascript object. This can be advantageous for you if you’re familiar with Javascript, because I’m sure you’re also familiar with this type of model.
Models put in use another very important element of AngularJS, which would be the $scope. The scope is like the glue between the controller and the view, and each controller has its own scope. While it’s true that a model is a plain Javascript object living within the controller, that does not mean that it can be created the same way as one. To make a model available to the view we need the scope.
We create models as in the code snippet below:
app.js
$scope.greeting = “Hello, Angular is awesome!”;
    var users = [
        {
            name: “John Doe”,
            point: 45
        },
        {
            name: “John Nash”,
            point: 85
        },
        {
            name: “Johny”,
            point: 55
        }];

 $scope.users = users;
In the code snippets above we have created two models, greeting and users, the first of which is a string and the second an array of Javascript objects. As you can see, both models are bound to $scope as if they were it’s properties, which is the element that will bound these values to the controller, on the other side of things.
3. The controller
Now on to the matter of the controller under the MVC pattern: The controller is the place where we put all our application logic and is created using Javascript classes. In this controller we can also call other components to work with. And the most important to explain is, in this controller our model, which we created above, lives.
As we said, the logic behind all the data visible to the user is modified by the controller, which is very easily created. Take a look at the code snippet below:
app.js
var app=angular.module('app', []);

app.controller('MyCtrl',function MyCtrl($scope) {
 $scope.greeting = “Hello, Angular is awesome!”;
    var users = [
        {
            name: “John Doe”,
            point: 45
        },
        {
            name: “John Nash”,
            point: 85
        },
        {
            name: “Johny”,
            point: 55
        }];

 $scope.users = users;

});
Undoubtedly, you will find it extremely familiar. Basically, the thing differentiating this code snippet from the one above it that we used to create the model is the wrapper function. That’s because all that code would go inside the function that creates the controller, in our case named MyCtrl. Another thing that you should keep in mind is the argument that the controller as a function takes: the $scope. Now it’s definitely clear that the binder between the controller and it’s logic is the $scope.
Also, what’s different in the code above from the one we posted previously is that in this case we have also created an Angular module, using just one line of Javascript code, but which is very important for the functionality of our app in it’s entirety.
4. The view and how we link it all together
In Angular, the View is what the users see, or else the DOM (Document Object Model). To display the data from controller, you can put Angular expressions in your view. This expression binds data from the model inside your controller. Moreover, since Angular is two-way data binding, the view will update itself automatically whenever there’s a change in the model from the controller, without you needing to write code specifically for achieving this.
But let’s see how can we put all this into play in the main HTML file. Take a look at the code snippet below:
index.html
<!DOCTYPE html>
<html>

<head>
    <title>MVC Architecture</title>
</head>

<body ng-app>
<div ng-controller=”MyCtrl”>
    <h1>{{greeting}}</h1>
    <h2>{{users.name, ' + ', users.point}}</h2>
</div>

<script src=”https://ajax.googleapis.com/ajax/libs/angularjs/1.0.7/angular.min.js”></script>
<script src="app.js" </script>

</body>
</html>
As you see, what we have done here is so easy that it can be considered just the wrapper of our function, however, it is just as important since it is the structure keeping all our architecture together. This is how we link together the model and the controller with the view.
In the code snippet above, you will see a regular main HTML file with it’s <head> and <body> sections. Note that just before we close the <body> section we script in the custom app.js file where we’ve placed the angular module and controller we just created, and also the default angular.min.js file, which we’ve taken directly from where it’s hosted online, but you can simply download it by yourself.
Besides that, we have placed the ng-app property inside the <body> tag, which serves to turn it all into an Angular app. While we could place it wherever else in the main file, in our case, this is also very benefiting.
As we mentioned, a View in Angular is how we present the data to our user. In our case, the view would consist of the two expressions inside the headings, which both contain two expressions that just display the value of the variable in them. You will remember the both of them being the models of our MVC architecture. However, this will not work at all if we didn’t somehow connect it all with the controller responsible for them, MyCtrl. To do that, we place the property ng-controller=”MyCtrl”> inside the <div> tag that encapsulates them, as shown above. This way we have bound the Model, to the View, while using the Controller to do it (it’s $scope, more specifically).
This is the gist of the MVC architecture, which is a building foundation of Angular apps as a whole. Even if sometimes there are beginners who don’t exactly start their learning by it, it will certainly make concepts more clear in the long term.
5. Download the source code
This was an example of AngularJS Architecture.
You can download the full source code of this example here: mvcarchitecture


