How to build a chrome extension
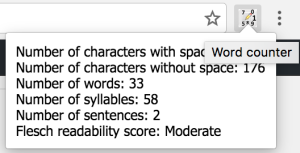
Chrome extensions allow you to add a new functionality to Chrome without having any knowledge about the actual browser source code. New extensions can be implemented using HTML, CSS and JavaScript. In the following example, we implement a word counter extension which helps to count characters, words, syllables and sentences of a selected text in the page. It also calculates the
Flesch readability score of the text. The Flesch readability score distinguishes the level of understanding of a text for audiences. If the score is less than 30, the text is distinguished difficult. If the score is greater than 90, the text is distinguished easy and if it is between 30 and 90 it is moderate.
1. Building a new extension
First, create a directory to implement the extension. Then, create a manifest file named manifest.json. This manifest is nothing more than a metadata file in JSON format that contains properties like extension’s name, description, version number and so on. At a high level, it will be used to declare to Chrome what the extension is going to do, and what permissions it requires in order to do those things.
In this example’s manifest, we declare a browser action, the activeTab permission to see the URL of the current tab, and the host permission to access the external Google Image search API.
{
  "manifest_version": 2,
  "name": "Word counter",
  "short_name":"Word count",
  "description": "This extension helps to count words and sentences of a selected text in the page.",
  "version": "4.0",
  "icons":
  {
  	"128":"icon.png",
  	"16":"icon.png",
  	"48":"icon.png"
  },
  "browser_action": {
    "default_icon": "icon.png",
    "default_popup": "popup.html",
    "default_title": "Word counter"
  },
  "permissions": [
    "activeTab",
    "https://ajax.googleapis.com/"
  ]
}
In the browser_action, two resources are defined icon.png and popup.html. Both files must exist in the same directory that you created.
icon.pngwill be displayed next to the Omnibox, waiting for user interaction. It is a 19px-square PNG file.popup.htmlwill be rendered inside the popup window and will be displayed in response to a user’s click on the browser action. It’s a standard HTML file.
<!doctype html>
<html>
  <head>
    <title>Word Counter Extension's Popup</title>
    <style>
      body {
        font-family: "Segoe UI", "Lucida Grande", Tahoma, sans-serif;
        font-size: 100%;
      }
      #text {
        white-space: pre;
        text-overflow: clip;
        overflow: hidden;
        font-family: Tahoma, sans-serif;
        font-size: 12px;
        max-width: 400px;
      }
    </style>
    http://popup.js
  </head>
  <body>


  </body>
</html>- The actual logic of rendering the content of the popup is implemented in popup.js.
/**
 * Get the current URL.
 *
 * @param {function(string)} callback - called when the URL of the current tab
 *   is found.
 */
function getCurrentTabUrl(callback) {
  var queryInfo = {
    active: true,
    currentWindow: true
  };

  chrome.tabs.query(queryInfo, function(tabs) {
    var tab = tabs[0];
    var url = tab.url;

    console.assert(typeof url == 'string', 'tab.url should be a string');
    callback(url);
  });
}

function getNumberOfSyllables(text){
  var n = 0;
  var arr = text.split(" ");
  for (var i = arr.length - 1; i >= 0; i--) {
    var word = arr[i];
    word = word.toLowerCase();
    if(word.length <= 3) { n += 1; continue; }
    word = word.replace(/(?:[^laeiouy]es|ed|[^laeiouy]e)$/, '');
    word = word.replace(/^y/, '');
    n += word.match(/[aeiouy]{1,2}/g).length;
  }
  return n;
}

function renderText(text) {
  var w = text.split(/[^\s]+/).length - 1;
  var st = text.split(/[^.!?]+/).length - 1;
  var c = text.length - 1;
  var cw = text.replace(/\s+/g, '').length;
  var sy = getNumberOfSyllables(text);
  var fr = 206.835 - 1.015 * (w/st) - 84.6 * (sy/w);
  var readability;
  if(fr <= 30) {     readability = "Difficult";   } else if(fr >= 90){
    readability = "Easy";
  } else{
    readability = "Moderate";
  }

  var finalText = "Number of characters with space: " + c + "\n" +
                    "Number of characters without space: " + cw + "\n" +
                    "Number of words: " + w + "\n" +
                    "Number of syllables: " + sy + "\n" +
                    "Number of sentences: " + st + "\n" +
                    "Flesch readability score: " + readability + " ";

  document.getElementById('text').textContent = finalText;
}

document.addEventListener('DOMContentLoaded', function() {
  getCurrentTabUrl(function(url) {

    chrome.tabs.executeScript( {
      code: "window.getSelection().toString();"
    }, function(selection) {
      if(!selection || selection == ''){
        document.getElementById('text').textContent = "Please select your text!";
      }else
        renderText(selection[0]);
    });

  });
});
Note: To add a tooltip for the extension, set the default_title key in the manifest file in the browser_action.
You should now have four files in your working directory: icon.png, manifest.json, popup.html,popup.js. Now let’s load the new extension files into Chrome.
2. How to load the extension
To load the extension on the browser, follow these steps:
- Visit
chrome://extensionson browser or open up the Chrome menu by clicking the icon to the far right of the Omnibox: and select Extensions under the Tools menu to get to the same place.
 - Ensure that the Developer mode checkbox in the top right-hand corner is checked.
- Click Load unpacked extension… to pop up a file-selection dialog.
- Navigate to the directory in which your extension files live, and select it.
If the extension is valid, it’ll be loaded up and active right away! If it’s invalid, an error message will be displayed at the top of the page. Then, correct the error, and try again.
Note: The manifest file is parsed only once the extension is loaded. If you want to see the new changes in action, the extension has to be reloaded. Visit the extensions page (go to chrome://extensions, or Tools > Extensions under the Chrome menu), and click Reload under the extension. All extensions are also reloaded when the extensions page is reloaded, e.g. after hitting F5 or Ctrl-R.
3. Source code
You can download the source code here. Also, the published version of the chrome extension can be found here: https://chrome.google.com/webstore/detail/word-counter/cgfjdjopdhopjgbcinafnfpcpjfeaidm


