jQuery Google Maps Example
Hello readers, in this basic example, developers will learn about Google Maps API and how to integrate a Google Map with jQuery.
1. Introduction
jQuery is nothing but a JavaScript library that comes with rich functionalities. It’s small and faster than many JavaScript code written by an average web developer. By using jQuery developers can write less code and do more things, it makes web developer’s task very easy. In simple words, jQuery is a collection of several useful methods, which can be used to accomplish many common tasks in JavaScript. A couple of lines of jQuery code can do things which need too many JavaScript lines to accomplish. The true power of jQuery comes from its CSS-like selector, which allows it to select any element from DOM and modify, update or manipulate it. Developers can use jQuery to do cool animations like fade in or fade out. They can also change the CSS class of a component dynamically e.g. making a component active or inactive. I have used this technique to implement tabbed UI in HTML. I can vouch for jQuery that once developers start using it, they will never go back to plain old JavaScript as jQuery is clear, concise, and powerful.
1.1 What are Google Maps?
Google Maps is a free web-based mapping service application and technology provided by Google. The application provides
- Comprehensive information about geographical regions, street maps, and the route planner for traveling by car, foot or public transportation
- Satellite views of many countries around the globe
- Liberty to create customized maps and the information displayed on them
1.1.1 Google Map Properties
Before initialization or loading the Google Map, developers have to create the map properties. A map has four main options namely:
centre: This property is used to center the map on a specific pointLatLng: This object holds the latitude and longitude coordinates of a given locationzoom: This property sets the current zoom level for the mapmapTypeId: This property sets the type of the map developers want. There are four types of maps provided by Google:- Roadmap (Default road map view)
- Satellite (Photographic view)
- Hybrid (Mixture of normal and satellite views)
- Terrain (Physical map based on terrain information i.e. mountains, rivers etc.)
These new APIs make developer’s life easier, really! But it would be difficult for a beginner to understand this without an example. This tutorial is outlined to show to the reader how to create a simple Google Map on your web-page.
2. jQuery Google Maps Example
Here is a step-by-step guide for implementing the jQuery Google Maps application.
2.1 Tools Used
We are using Eclipse Kepler SR2, JDK 8 and Maven. Having said that, we have tested the code against JDK 1.7 and it works well.
2.2 Project Structure
Firstly, let’s review the final project structure, in case you are confused about where you should create the corresponding files or folder later!
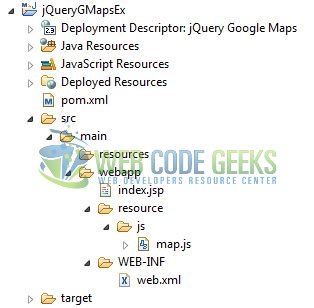
2.3 Project Creation
This section will demonstrate on how to create a Java-based Maven project with Eclipse. In Eclipse Ide, go to File -> New -> Maven Project.
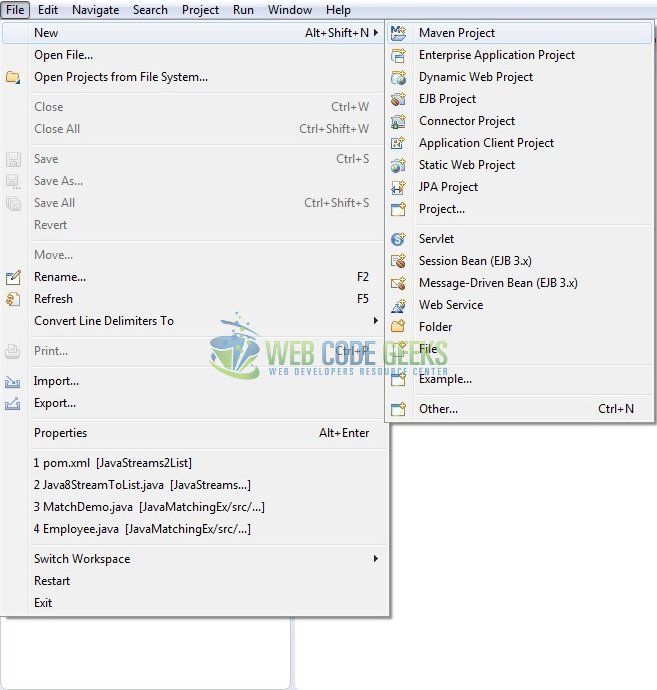
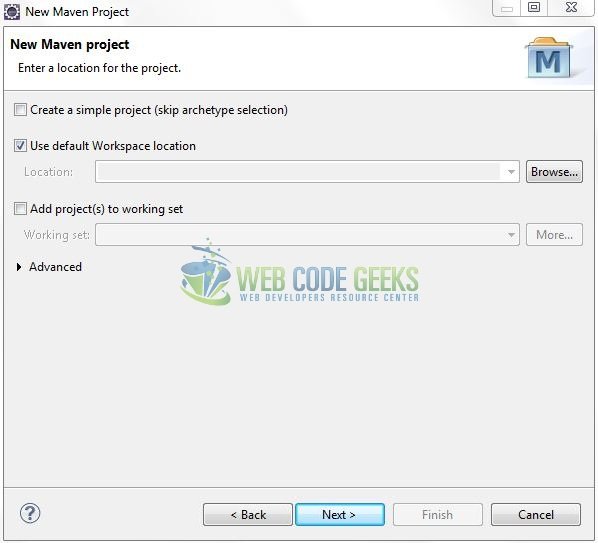
In the New Maven Project window, it will ask you to select project location. By default, ‘Use default workspace location’ will be selected. Just click on next button to proceed.
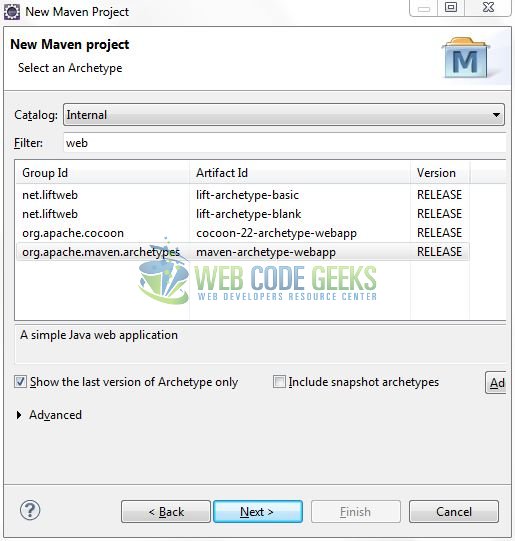
Select the ‘Maven Web App’ Archetype from the list of options and click next.
It will ask you to ‘Enter the group and the artifact id for the project’. We will input the details as shown in the below image. The version number will be by default: 0.0.1-SNAPSHOT.
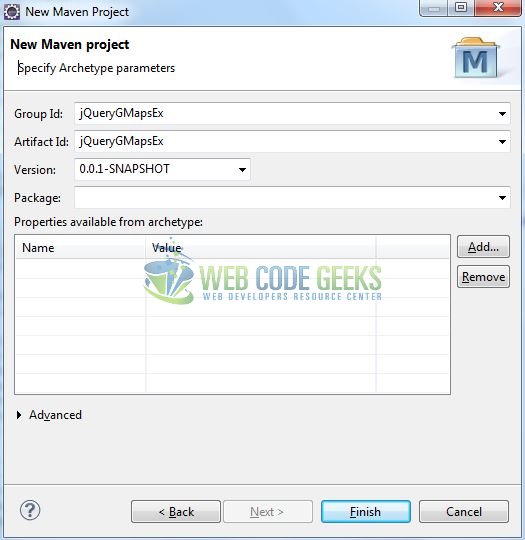
Click on Finish and the creation of a maven project is completed. If you observe, it has downloaded the maven dependencies and a pom.xml file will be created. It will have the following code:
pom.xml
<project xmlns="http://maven.apache.org/POM/4.0.0" xmlns:xsi="http://www.w3.org/2001/XMLSchema-instance" xsi:schemaLocation="http://maven.apache.org/POM/4.0.0 http://maven.apache.org/xsd/maven-4.0.0.xsd">
	<modelVersion>4.0.0</modelVersion>
	<groupId>jQueryGMapsEx</groupId>
	<artifactId>jQueryGMapsEx</artifactId>
	<version>0.0.1-SNAPSHOT</version>
	<packaging>war</packaging>
</project>
Let’s start building the application!
3. Application Building
Let’s create a basic application to illustrate the simple Google Map in the jQuery framework.
3.1 Load the Google Map API
Since it is a pure JavaScript framework, developers should add its reference using the <script> tag.
<script type="text/javascript" src="https://www.webcodegeeks.com/wp-content/litespeed/localres/aHR0cHM6Ly9tYXBzLmdvb2dsZWFwaXMuY29tL21hcHMvYXBpL2pz?key=YOUR_API_KEY&callback=myMap" async defer></script>
Do remember to replace the ” YOUR_API_KEY ” with your API Key. This key is free, but Google monitor the application’s Maps API usage and if it exceeds the utilization limits, developers must purchase the additional share. To create an API Key, developers can refer to this link.
3.2 Define a jQuery Function
In this step, we’ll define a simple javascript function to initialize the Google Map on the page load.
map.js
function myMap() {
	var latLng = new google.maps.LatLng(28.704, 77.102);
	var mapProp = {
			zoom: 8,
			center: latLng,
			mapTypeId: google.maps.MapTypeId.ROADMAP
	};

	// Following Command Will Create the New Map Object
	var map = new google.maps.Map(document.getElementById("googleMap"), mapProp);
}

// Following Command Will Load the Google Map
google.maps.event.addDomListener(window, "load", myMap);
3.3 Define the Application
Next, we will define the simple container element to hold the map. Generally, a <div> tag is used for this purpose.
index.jsp
<div id="googleMap"></div>
Do note, the container element is named as googleMap and we have used CSS to give it a width and a height.
3.4 First Google Map Application
Complete all the above steps and save the file. Let’s see the sample code snippet.
index.jsp
<!DOCTYPE html>
<html>
   <head>
      <meta http-equiv="Content-Type" content="text/html; charset=UTF-8">
      <title>jQuery Google Maps Example</title>

	  <!-- Javascript File -->
      <script type="text/javascript" src="resource/js/map.js"></script>

      <!-- To Use the GMap Code, Developer's Need To Get a Free Api Key from Google. Read more at: https://www.w3schools.com/graphics/google_maps_basic.asp -->
      <script type="text/javascript" src="https://www.webcodegeeks.com/wp-content/litespeed/localres/aHR0cHM6Ly9tYXBzLmdvb2dsZWFwaXMuY29tL21hcHMvYXBpL2pz?key=AIzaSyBE7kfwSaqVFjr57AHNk2N9057p-d8PNUU&callback=myMap" async defer></script>

      <style type="text/css">
      	#googleMap {
      		width: 100%;
      		height: 500px;
      	}

      	.blueText {
      		color: #337ab7;
      	}
      </style>
   </head>
   <body>
      <h1 align="center" class="blueText">My First Google Map</h1>
      <div id="googleMap"></div>
   </body>
</html>
4. Run the Application
As we are ready for all the changes, let us compile the project and deploy the application on the Tomcat7 server. To deploy the application on Tomat7, right-click on the project and navigate to Run as -> Run on Server.

Tomcat will deploy the application in its web-apps folder and shall start its execution to deploy the project so that we can go ahead and test it in the browser.
5. Project Demo
Open your favorite browser and hit the following URL to display a simple Google Map centered on New Delhi, India.
http://localhost:8082/jQueryGMapsEx/
Server name (localhost) and port (8082) may vary as per your Tomcat configuration. Developers can debug the example and see what happens after every step. Enjoy!
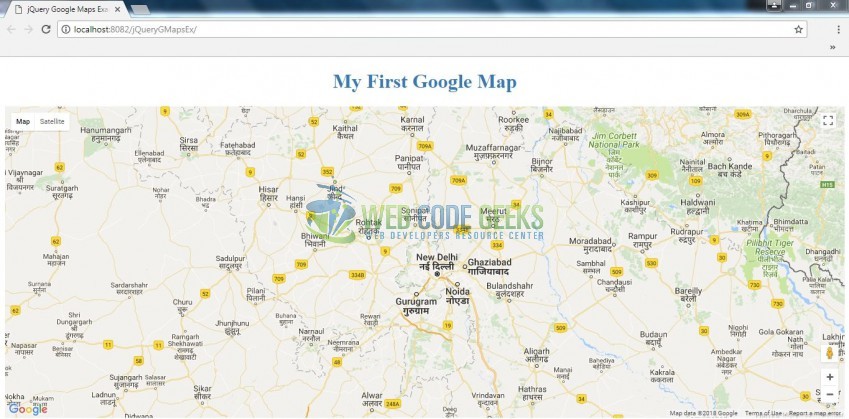
That’s all for this post. Happy Learning!!
6. Conclusion
In this tutorial, developers learned how to create a simple application using the Google Map API. Developers can download the sample application as an Eclipse project in the Downloads section. I hope this article served you with whatever developers were looking for.
7. Download the Eclipse Project
This was an example of jQuery Google Maps for the beginners.
You can download the full source code of this example here: jQueryGMapsEx


